


I feel that the biggest challenge with the french army in the Napoleonic wars are the vast amounts of white everywhere. I had to try a couple of different ways of doing before I found one that I was happy with. For blue color i wanted it to be a bit lighter than what I seen the usual way of doing it is, but keeping with the purplish tint.
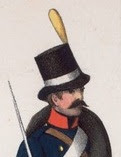
Painting guide for Line infantry in Bardin regulation uniform:
When painting the french line I divide it into three parts: Black part, brown part, White part and finale.
I always start with white primer use any brand you comfortable with, I have tried the army painter one and it almost ruined an entire battalion so I'm staying with GWs.
Black part:
Second part is the basecoats. I start with GWs Regal Blue for the jacket, use any black for the cartridge case and shako. After that I use GWs Blood red for the cuffs, I leave the red piping for later. For the musket and any water bottle I use Vallejo Gunmetal metal Using GWs Codex grey I lightly dry brush the shako taking care to highlight the shako brim cartridge case, I also use Codex grey to paint the rolled greatcoat.
When that is done I use GWs Enchanted blue to highlight the regal blue parts. Vallejo Silver for the musket highlight.
I then use the GW Black to wash all the painted parts including the cossbelts and lapel.
Brown part
Using Vallejo Beasty brown I paint the musket, bayonet case, backpack and water bottle cord. I then take Vallejo Polished gold for the shako ornamentation and chinstrap.
I then use the GW Brown Wash on it.
White Part
I change to a detail brush as I find it to give better coverage. I then use Vallejo White to paint the cross belt and the lapel. I'm try to be tidy and get a good coverage but there is no need to waste a lot of time on it..
I them mix 3 parts Vallejo White with 1 part Vallejo Cold grey add some drops of water and give the pants a wash with it.
When the white have dried I use Vallejo White to highlight the pants and tidy up the crossbelts and to the white on the cuffs.
Finale
I begin with Vallejo Polished gold as an highlight for all the shako ornamentation and then I paint all the buttons with it. After that I change to GWs Blood red and highlight the cuffs and paint in all the red piping.
I basecoat the face with Vallejo Dwarven flesh, give it a highlight of GW Elf Flesh, a wash of GWs flesh wash and then a highlight of elf flesh.
Any hair I paint black as otherwise my OCD would force me to spend to much time on it.
Last thing I do is to paint the cow hide pattern on the backpack using Vallejo Bone white.
And there you have a finished line infantry man! I usually do then in groups of six but if I have time and the willpower I try to do the basecoat on 30 at a time.
Also as promised here are some Voltigeurs painting using this technique. I have two bases like this for each battalion in my division using a mix of perry metal and plastic.
 |
| Voltigeurs on 50mm warmachine bases |
Regars,
Anders the elder
I like: the idea of dual basing on a bigger round base and of course the painting.
SvaraRaderaNot so sure about the height of the base as it might stick out a little ugly on that fine big table you're planning to have.
Hi,
RaderaThank you, I really like how it looks on the table and it makes a nice distinction between "units" (Line battalions, Cavalry squadrons, Artillery) and "markers" (Generals, Skirmishers, ADCs).
Anders the younger voiced the same concern but the difference ain't to big. Also the regular units are going to get some height to the bases as we are going to do movement trays.
Regards,
Anders the elder