Hello,
Sorry no pictures this weekend because of life coming in the way, or in Anders the younger's case a cottage.
But we got some things done:
I have now finished the 24 line infantry you have seen in the WIP pictures so now there is only 18 models left to be done in the Bardin brigade. I have also started with two test figures for a Legre brigade and the result looks promising.
Anders the younger have started basing the West Prussian grenadier battalion and finished the assembling of 11 more Prussian Hussars, He just need to get some green stuffing done.
We have done some talking and decided to start with the table this month. I went down to the game store today and picked up a Games workshop citadel battlemat. We also have put in an order for 28 woodland scenic 3-6 inch trees and a lot of foilage, and silfor tufts.
The plan with the table is to make it very modular and well go into the details of that later but basically the plan is this:
STAGE 1
Trees and Hedges
STAGE 2
Roads, hills and rivers
STAGE 3
Large farm house
So stay tuned in.
Regards,
Anders the elder
söndag 29 april 2012
fredag 20 april 2012
Landwehr battalion ready
Hello,
My first battalion of prussian landwehr is finished and here is the result. I'm very satisified and also keen on building another of these units. This battalion in particular will be the only landwehr unit in my prussian brigade with a banner. They were not really given out to all units and was not standard - allthough the battalions sometimes procured their own flags to embody their pride and accomplishments.
Kindest regards,
Ander the younger
My first battalion of prussian landwehr is finished and here is the result. I'm very satisified and also keen on building another of these units. This battalion in particular will be the only landwehr unit in my prussian brigade with a banner. They were not really given out to all units and was not standard - allthough the battalions sometimes procured their own flags to embody their pride and accomplishments.
 |
| Vorwärts! |
 |
| Oh the colours... |
 |
| A close-up of the command with a possible Freiherr of Silesia, also somewhat of a cameo of me, leading from the ranks. |
Kindest regards,
Ander the younger
French line battalion in greatcoats with Eagle
Here is another update on my gathering french forces. An eagle-battalion in great coats!


As it stands now I have two battalions finished for my great coat brigade. I am able to paint them so fast compared to the Bardin uniform battalions, two days for great coats and one week for Bardin battalions. Right now I'm focusing on getting the Bardin brigade done as then Anders the younger can use the spare great coats to do more Landwehr.
Regards,
Anders the elder
Beginning of a French heavy cavalry brigade
Greetings,
Here is an update on my heavy cavalry. En avant!
 |
| Noble cuirassiers, reminding us of the burgundian knights of old... |
 |
| Cuirassier command, with a trumpeter in the imperial livery. |
 |
| Daunting dragoons |
 |
| A close-up of the dragoons. |
 |
| The dragoon command with mounted sappeur! |
Regards,
Anders the elder
Work in progress 2...
Hello everybody!
It has been a while since we last updated the blog due to work and studies. However, me and Anders the elder have still worked on our napoleonics project. Here are some pictures on what we are doing right now.
Please leave your comments and ask us about anything!
Regards,
Anders the younger
It has been a while since we last updated the blog due to work and studies. However, me and Anders the elder have still worked on our napoleonics project. Here are some pictures on what we are doing right now.
 |
| 2nd Silesian Hussars on assembly. For more thoughts on the conversions and painting of prussian hussars, see the archives. |
 |
| West Prussian grenadiers. Just about to be based. |
 |
| Two weip battalion of french line infantry, soon to be fielded against the valiant foe. |
 |
| French grenadiers and sappeur. A small but quite nice conversion, putting the french hussar heads on grenadiers and voltigeurs to give them a little more appeal. |
Please leave your comments and ask us about anything!
Regards,
Anders the younger
lördag 7 april 2012
Basing the battalions
Hello again,
After getting many positive comments on our basing we decided to share our ways of basing with you. We hope that you will find it helpful when trying to give your forces a more life-like appearance.
My experience is that details are what makes the bases look good. However, you have to be careful not to stifle the base with all sorts of materials. Choose your materials carefully, colour- and texture-wise and don't use more than three basic materials.
For this guide we've used my Landwehr and Anders the elder Voltigeurs. We begin with the prussians:
 |
| First I use Vallejos Sandy paste to get a good texture and to smooth out the base. After drying I paint it with watered down Vallejo Flat earth. |
 |
| The first thing I add to the base are tufts of grass, patches of flowers (army painter) and other distinguishing elements. I make sure to not use too many tufts (army painter) on the same base as it can easily make it too heavy, so to speak. Remember that the bases are there to complement and not to take over. |
 |
| The second thing I add is a mix of static grass and flock from Gale force nine. I carefully distribute it in relatively coherent fields or streaks across the base to make it look more natural. The last thing we want is to have isolated patches of different basing materials. |
 |
| The third material added is a lovely flock from Gale force nine (summer flock blend), that really gives the base an interesting and colourful touch, without being too garish. Soon the painted sandy paste will disappear but still give a good background colour to the basing materials. |
 |
| Lastly I cover the remaining spots with a darker material, in this case with a tiny amount of dark green clump foliage and dark grass. This is to give a contrasting colour and a more dynamic base, suggesting a diverse flora. After everything has dried I paint the edge of the base black to frame the base (not shown in the picture). |
This is my take on basing. While our bases are similar when it comes to materials and philosophy there are a few differences that should be pointed out. Here is how Anders the elder does his bases:
 |
| In a similar way, Anders starts off with sandy paste but instead using Vallejos Beasty brown as a base colour. |
 |
| The first part consists of the summer flock blend (Gale force 9) being spread out in patches on the base. |
 |
| Secondly, Anders adds a light green static grass (GF9 because of shorter straws) that blends in quite nicely with the flock. This is then followed by some medium green fine clump foliage (GF9) to add a bit of texture. |
 |
| Lastly the tufts of grass, flowers etc are added to finish off the base. While I do the base around the tufts and flowers (Army painter) Anders the elder chooses to place them in the last step. Whatever the order - the results are very pleasing! |
In general my prussian bases are less bright to fit my painting style and to complement the colour scheme of my prussian brigade. Anders french forces however are more colourful and bright and because of that they need bases accordingly.
Again, we hope that this guide might inspire you in your basing adventures. Feel free to comment if you have questions or opinions on basing.
Kindest regards,
Anders the younger
torsdag 5 april 2012
Peacocks and Sparrows
Greetings,
Kindest regards,
Anders and Anders
One of the aspects of the Napoleonic armies are the great differences in style between the gallant french and harsh prussians.
The command sections of our brigades/detachments will consist of a General de Brigade, Aide de camp and Colonel, and Oberst, Feldjäger and Staff officer, respectively. These will be based on 50mm Warmachine bases. In R2E the General/Oberst will be the commander, while the Colonel/Feldjäger will count as an "officer" making him able to join combats but having no command radius or command points. The Aide de camp/Staff officer is there to look good until the General/Oberst meet an untimely end. If that happens he will be replaced according to the R2E rules, with the Aide de camp/Staff officer.
 |
| When the brigade is finished this rugged gentleman will be the Oberst commanding the Silesian Landwehr detachment. |
 |
| The Oberst comfortable in his "Kleine uniform" (campaign uniform). I did not use silver for his sash, instead I went with light grey, white and black stripes. |
 |
| You might have seen this one earlier in a WIP post. Here is a better picture. An aspect of this model I'm proud of the gold, and there's alot of it! |
 |
| This General will be the commander of my brigade wearing the Bardin regulation uniform. |
 |
| I wanted to do something different with the horse for my cavalry commanders and officers I will try to do grey or white horses. A thing that I think makes this model pop is the light blue and golden sash. |
 |
| This is the Aide de camp for the above pictured General. A bit of a dandy with his leopard skin horse furniture and good looks. |
 |
| Not to mention his fabulous red boots with white trim and tassles. An interesting detail for french ADC's is the coloured armband denoting the rank of the General they serve. In this case light blue for a General de Brigade. |
Kindest regards,
Anders and Anders
Landwehr; an alternative solution
Happy Easter!
Regards,
Anders the younger
Landwehr, being one of the most typically prussian troops during the Napoleonic wars is something that needs special attention. When I started building my first Landwehr battalion the Perry brothers hadn't released their metal landwehr and I was and am still not impressed by the Warlord plastics.
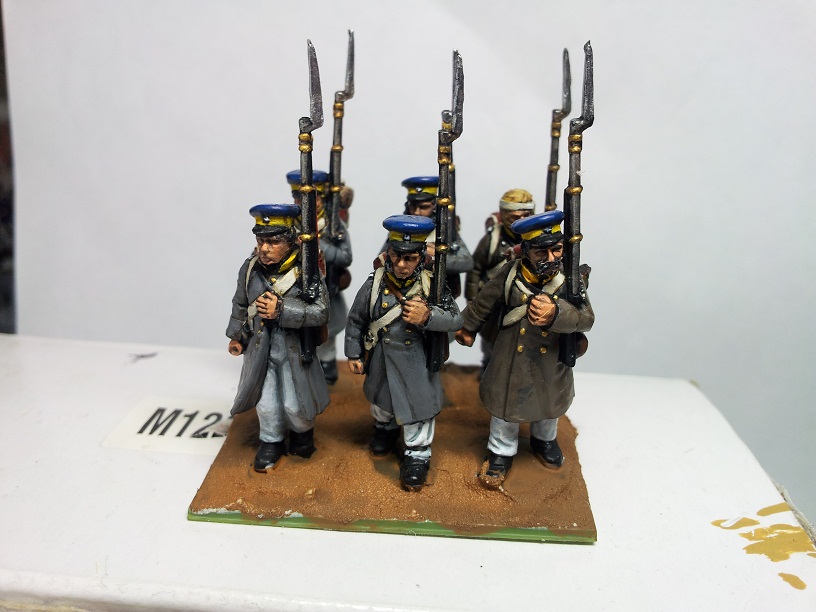
Me and Anders talked it over, as we usually do and discussed the possible solutions. As we did the research on the landwehr we found that the classic blue litewka might not have been as universal as some would claim. Considering this and my wish to differentiate my landwehr from the blue line infantry I decided to go the great coats to give rag-tag campaign look. After the dust settled I did some serious kitbashing and came up with a pleasing result.
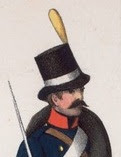
Using the Perry french line infantry in great coats as a base I used the forage cap heads from the Perry prussians. For variety I also converted the french heads that came with the models. I would cut off the shako above the brim and finished by making the cloth top with green stuff. To make them look a bit more rag-tag I mixed the backpacks and cartridge boxes from Perry and Victrix. Anders the elder got bored and gave some of them nice facial hair to give them a more rugged look.
 |
| Different coloured coats and buttons make them look more unregimental and civilian. They blend in well with the line infantry but still look distinctive. This base is a part of my first finished landwehr battalion, out of the planned three. |
Regards,
Anders the younger
French Line Dragoons
Hi,
Regards,
Anders the elder
These dragoons were the first models I painted for my division which resulted in a different painting style than the rest. I don't think that anyone except me will notice the difference, but used this unit to learn how to paint again. As painting napoleonics is different to the painting style I was used to I had to figure out new ways to be effective but still get a good result.
As you could read in Anders the younger post about hussars my cavalry force will consist of Line Dragoons and Cuirassiers. I chose the 20th regiment of Line Dragoons because I really like the combination of green and yellow and I wanted to paint one that is not as usual.
 |
| Instead of having a guidon in my cavalry command bases I decided to do something different. As you can see I added a converted mounted sappeur to spice it up. Also I used the head of an elite company soldier for my officer to get the mustache and plume fitting a french gentleman. |
 |
| I build all my cavalry to look like they are charging or closing as I feel it fits my aggressive playstyle. |
 |
| As an easter egg here is a treat of Cuirassiers. An interesting thing to note is that I paint them as I paint my infantry, only excluding the final highlight of enchanted blue. I find the darker jackets more intimidating. |
Regards,
Anders the elder
Converting Prussian hussars
Hello fellow wargamers,
Regards,
Anders the younger
It has been a busy week for me at the university. I'm currently writing a thesis in history, but do not fear, I've painted some new stuff recently and done some converting.
When building my prussian force I talked to Anders the Elder and we decided that his french force should contain more line and heavy cavalry while I would use mainly light cavalry. Our experience so far with R2E has taught us that there is a great difference between the two sorts of cavalry. The light cavalry works excellent as a harassing force, to counter enemy movements, ambush isolated battalions and destroy artillery. The heavy and line cavalry on the other hand works much better as a stand off force, to control large areas of the table just by its presence. This difference in the choice of cavalry for our forces will create an interesting dynamic on the battlefield.
At first I wanted to make the 1st Silesian hussars in their brown and yellow jackets but I soon realised that in my all blue-and-gray brigade I wanted a dash of colour. I then decided to make the 2nd Silesian hussars, with their beautiful green, gold and red. It is funny how two regiments from the same region can look so different!
When it comes to prussian cavalry you can get it in metal from Perry or Calpe, all high quality models. As I'm planning to have a large amount of hussars in my force I need an easier way of quickly modeling the squadrons. After having discussed the issue with Anders the elder we came to the conclusion that we could use the Perry plastic french hussars with minor alterations to get the desired look. The durability and feel of plastic is something I also take into consideration (not saying that I won't use metal cavalry, don't worry).
 |
| The main difference is the horse furniture, elongated and square, easily converted with green stuff. The head with oilskin covered shako is from the Perry plastic prussian line infantry. |
 |
| This is the result. A dashing hussar of the 2nd Silesian on campaign. A very fun model to paint, especially colour-wise. I really look forward to paint the whole regiment! |
 |
| Most hussars won't have the pelisse (due to historical accuracy) but I will have some because that is what make them look like hussars! |
Regards,
Anders the younger
måndag 2 april 2012

söndag 1 april 2012
GMB and Bicorne
I just took this picture to show off some GMB flags, I'm extremely happy with the quality and their customer service.
The flag finales and Eagle are from Bicorne miniatures quick delivery, friendly and helpful.
Regards,
Anders the elder.
 |
| Command stands for the first five line battalions |
The flag finales and Eagle are from Bicorne miniatures quick delivery, friendly and helpful.
Regards,
Anders the elder.
Big enough table?
This weekend we went over to the newly bought house of a friend to look at the start of his Mancave and to build some gaming tables. After a couple of hours this was the result:
The tables are MDF board with the Citadel Battlemat glued on. I think this mat is the highest quality product they produce and I strongly recommend it.
Regards,
Anders the Elder
 |
| Me pointing at an 28mm artillery piece with 6 crew members |
Regards,
Anders the Elder
Painting guide! With side order of Voltigeurs
We have had a busy weekend with a lot of painting and table building. When it comes to painting I'm a firm believer in that you should aim for being a smart painter instead of a fast one. In my experience, the way I paint results in the same amount of time spend on each six figures as someone who speed paints.
I feel that the biggest challenge with the french army in the Napoleonic wars are the vast amounts of white everywhere. I had to try a couple of different ways of doing before I found one that I was happy with. For blue color i wanted it to be a bit lighter than what I seen the usual way of doing it is, but keeping with the purplish tint.
Painting guide for Line infantry in Bardin regulation uniform:
When painting the french line I divide it into three parts: Black part, brown part, White part and finale.
I always start with white primer use any brand you comfortable with, I have tried the army painter one and it almost ruined an entire battalion so I'm staying with GWs.
Black part:
Second part is the basecoats. I start with GWs Regal Blue for the jacket, use any black for the cartridge case and shako. After that I use GWs Blood red for the cuffs, I leave the red piping for later. For the musket and any water bottle I use Vallejo Gunmetal metal Using GWs Codex grey I lightly dry brush the shako taking care to highlight the shako brim cartridge case, I also use Codex grey to paint the rolled greatcoat.
When that is done I use GWs Enchanted blue to highlight the regal blue parts. Vallejo Silver for the musket highlight.
I then use the GW Black to wash all the painted parts including the cossbelts and lapel.
Brown part
Using Vallejo Beasty brown I paint the musket, bayonet case, backpack and water bottle cord. I then take Vallejo Polished gold for the shako ornamentation and chinstrap.
I then use the GW Brown Wash on it.
White Part
I change to a detail brush as I find it to give better coverage. I then use Vallejo White to paint the cross belt and the lapel. I'm try to be tidy and get a good coverage but there is no need to waste a lot of time on it..
I them mix 3 parts Vallejo White with 1 part Vallejo Cold grey add some drops of water and give the pants a wash with it.
When the white have dried I use Vallejo White to highlight the pants and tidy up the crossbelts and to the white on the cuffs.
Finale
I begin with Vallejo Polished gold as an highlight for all the shako ornamentation and then I paint all the buttons with it. After that I change to GWs Blood red and highlight the cuffs and paint in all the red piping.
I basecoat the face with Vallejo Dwarven flesh, give it a highlight of GW Elf Flesh, a wash of GWs flesh wash and then a highlight of elf flesh.
Any hair I paint black as otherwise my OCD would force me to spend to much time on it.
Last thing I do is to paint the cow hide pattern on the backpack using Vallejo Bone white.
And there you have a finished line infantry man! I usually do then in groups of six but if I have time and the willpower I try to do the basecoat on 30 at a time.
Also as promised here are some Voltigeurs painting using this technique. I have two bases like this for each battalion in my division using a mix of perry metal and plastic.
Regars,
Anders the elder
I feel that the biggest challenge with the french army in the Napoleonic wars are the vast amounts of white everywhere. I had to try a couple of different ways of doing before I found one that I was happy with. For blue color i wanted it to be a bit lighter than what I seen the usual way of doing it is, but keeping with the purplish tint.
Painting guide for Line infantry in Bardin regulation uniform:
When painting the french line I divide it into three parts: Black part, brown part, White part and finale.
I always start with white primer use any brand you comfortable with, I have tried the army painter one and it almost ruined an entire battalion so I'm staying with GWs.
Black part:
Second part is the basecoats. I start with GWs Regal Blue for the jacket, use any black for the cartridge case and shako. After that I use GWs Blood red for the cuffs, I leave the red piping for later. For the musket and any water bottle I use Vallejo Gunmetal metal Using GWs Codex grey I lightly dry brush the shako taking care to highlight the shako brim cartridge case, I also use Codex grey to paint the rolled greatcoat.
When that is done I use GWs Enchanted blue to highlight the regal blue parts. Vallejo Silver for the musket highlight.
I then use the GW Black to wash all the painted parts including the cossbelts and lapel.
Brown part
Using Vallejo Beasty brown I paint the musket, bayonet case, backpack and water bottle cord. I then take Vallejo Polished gold for the shako ornamentation and chinstrap.
I then use the GW Brown Wash on it.
White Part
I change to a detail brush as I find it to give better coverage. I then use Vallejo White to paint the cross belt and the lapel. I'm try to be tidy and get a good coverage but there is no need to waste a lot of time on it..
I them mix 3 parts Vallejo White with 1 part Vallejo Cold grey add some drops of water and give the pants a wash with it.
When the white have dried I use Vallejo White to highlight the pants and tidy up the crossbelts and to the white on the cuffs.
Finale
I begin with Vallejo Polished gold as an highlight for all the shako ornamentation and then I paint all the buttons with it. After that I change to GWs Blood red and highlight the cuffs and paint in all the red piping.
I basecoat the face with Vallejo Dwarven flesh, give it a highlight of GW Elf Flesh, a wash of GWs flesh wash and then a highlight of elf flesh.
Any hair I paint black as otherwise my OCD would force me to spend to much time on it.
Last thing I do is to paint the cow hide pattern on the backpack using Vallejo Bone white.
And there you have a finished line infantry man! I usually do then in groups of six but if I have time and the willpower I try to do the basecoat on 30 at a time.
Also as promised here are some Voltigeurs painting using this technique. I have two bases like this for each battalion in my division using a mix of perry metal and plastic.
 |
| Voltigeurs on 50mm warmachine bases |
Regars,
Anders the elder
Prenumerera på:
Inlägg (Atom)